
In todays world where personal touches are highly valued wax seal stickers have become a way to infuse character and uniqueness into your letters, packages and creative endeavors. These small pieces of art not embody a sense of tradition. Also bring a contemporary flair to self expression. Whether you're an enthusiast of stationery a DIY enthusiast or simply someone who appreciates lifes nuances mastering the art of creating wax seal stickers can unlock a realm of opportunities.
The Allure of Wax Seal Stickers
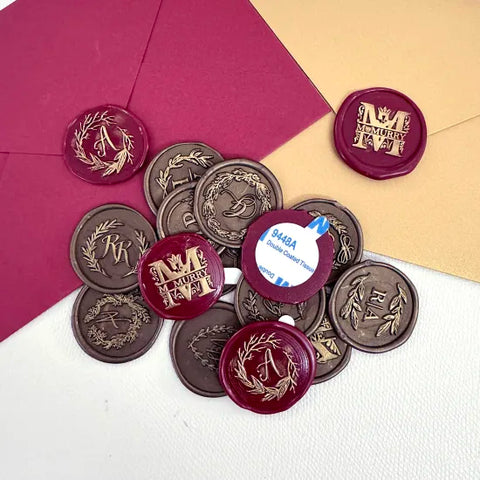
Wax seal stickers offer the blend of convenience to adhesive labels and the timeless sophistication associated with traditional wax seals. These petite stickers boast benefits that make them tools for any crafting enthusiast;
- Ease; Unlike conventional wax seals that involve melting and stamping wax seal stickers can be effortlessly adhered with a peel and stick action saving you time and energy.
- Personalization; With a range of designs and colors, at your disposal you can craft stickers that mirror your style or complement the theme of your project.
- Creating a wax seal is, about enhancing the beauty and elegance of any surface with its details and textured finish.
To start making your wax seal stickers make sure you have these items ready;
- Sealing wax in sticks, beads or pellets
- A wax seal stamp engraved with your chosen design
- sided adhesive sheets or sticker paper
- Tools for melting wax like a spoon, furnace or hot glue gun
- Scissors or a craft knife
- Optional; Decorative elements such as glitter or dried flowers
Here's a simple guide to help you craft your own wax seal stickers;
- Melt the Wax; Use your melting tool to melt the sealing wax until it becomes smooth and easy to pour. Take care not to overheat the wax as it can alter its color and texture.
- Stamp; Pour amounts of melted wax, onto a stick surface or silicone mat allowing them to form circular shapes.
- While the wax is still soft press your wax seal stamp into each puddle to make an impression.
- Allow the stamped wax seals to cool completely until they harden and can be easily lifted off the surface.
- Peel off the adhesive sheets or sticker paper carefully and place the cooled wax seals on the sticky surface with a small gap, between each one.
- Optional; To add a touch consider sprinkling glitter, dried flower petals or other decorations on the wax seals before they fully dry.
- Once the adhesive has bonded with the wax seals securely use scissors or a craft knife to trim around each seal creating stickers. Gently peel them off the backing paper and your wax seal stickers are ready for use!
Ideas for Design and Inspiration
The versatility of wax seal stickers allows for applications. Here are some imaginative ways to integrate them into your projects;
- Personalized Stationery; Enhance your envelopes, letters or greeting cards with a wax seal sticker, for an added touch of elegance.
- Enhance your gift presentation, with wax seal stickers to add a touch of elegance to your wrapped gifts turning them into works of art.
- Add a flair to your craft projects like handmade journals, scrapbooks or home decor items by incorporating wax seal stickers for a nostalgic touch.
- Make personalized wax seal stickers with your initials or a special symbol to give as memorable keepsakes to your wedding guests.
Tips for Achieving the Perfect Seal
Creating wax seal stickers is simple. Here are some tips for flawless results;
- Match wax colors to create custom shades that complement your project.
- Keep your wax seal stamp press firmly for impressions.
- Control the melting temperature of the wax for results.
- Use high quality sealing materials, for lasting and durable seals.
To maintain and store your wax seal stickers, in top notch condition adhere to these guidelines;
- Keep in a Cool Dry Location; Avoid exposing the stickers to heat or moisture as this can lead to the deteriorating or the seals losing their shape.
- Shield from Direct Sunlight; Prevent prolonged sunlight exposure to avoid the wax seals from fading or changing color over time.
- Handle with Gentle Care; Refrain from handling or applying pressure on the seals to prevent details from getting distorted or damaged.
Experience the Pleasure of Crafting DIY Wax Seal Stickers
Crafting wax seal stickers is not just a fun activity but an opportunity to engage with the historical significance and traditional art of seal making. Each sticker you create is a work of art reflecting your style and creativity. Enjoy this hands on craft. Let your imagination soar as you embellish your projects with these decorations. Whether you're a crafter or new to the world of wax seals making wax seal stickers will surely deepen your appreciation, for beauty. So gather your supplies unleash your creativity and enhance your projects with these wax seal stickers.